Category Archives: Tips

How to share a UPS from a Synology NAS to a Windows computer

Problem: I want to share a UPS between a Synology NAS and a Windows machine. They are both plugged into the UPS but only the Synology NAS is plugged into the serial port of the NAS. So only the Synology would know when the power went out and when to shutdown. I need the Windows computer plugged into the UPS to know when it is time to cleanly shutdown.

Solution: I found this blog post:

But it was for a previous version of WinNUT, so I’m letting you know how I got it working with WinNUT 2.0.4.0.

The solution is to install WinNUT client on the windows machine and configure it to talk to the Synology network UPS server.

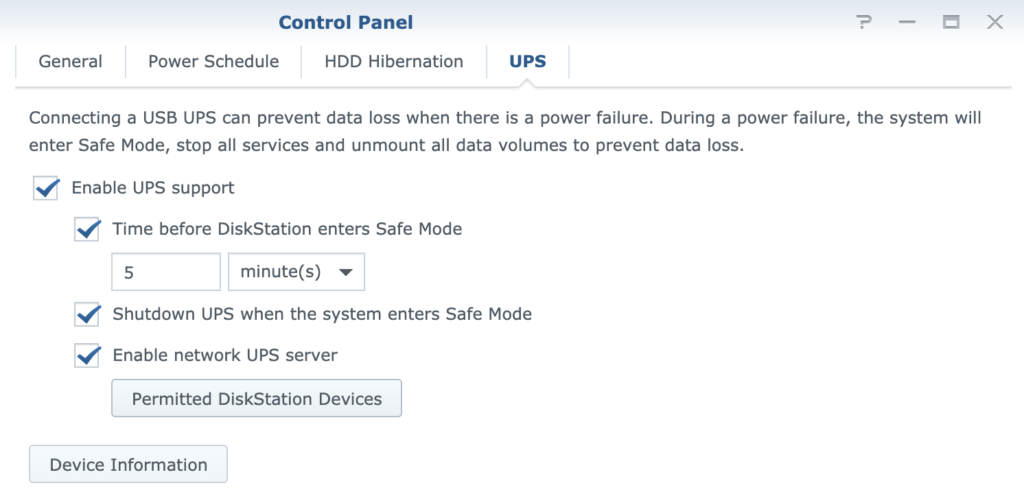
  • Enable network UPS server on synology by going to the Diskstation control panel -> Hardware & Power -> UPS tab. Check the “Enable network UPS server” box.
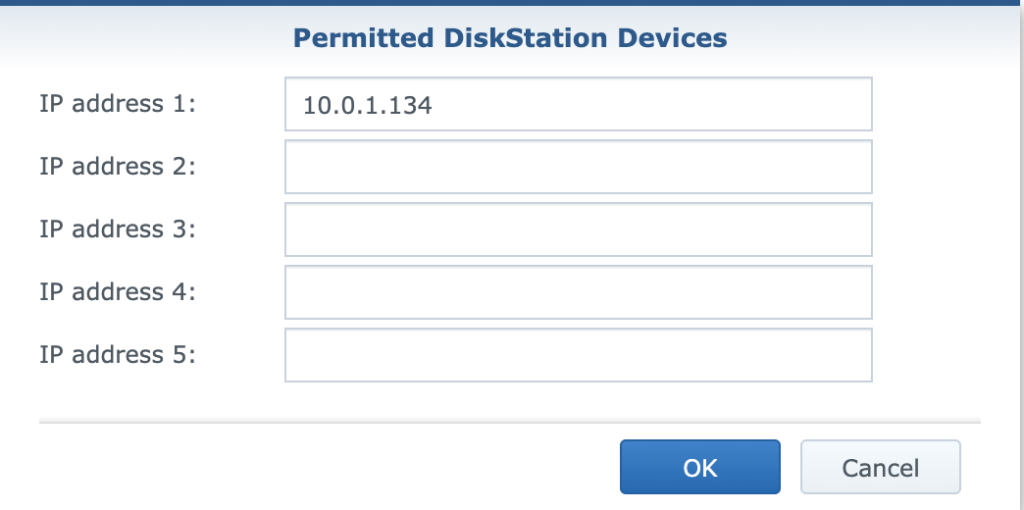
  • Click on the “Permitted DiskStation Devices” button and add the windows IP address to the Synology UPS network server “Permitted diskstation devices” list:
  • Install WinNUT on the Windows computer.
  • Click on the “Settings” menu and go to the “Connection” tab
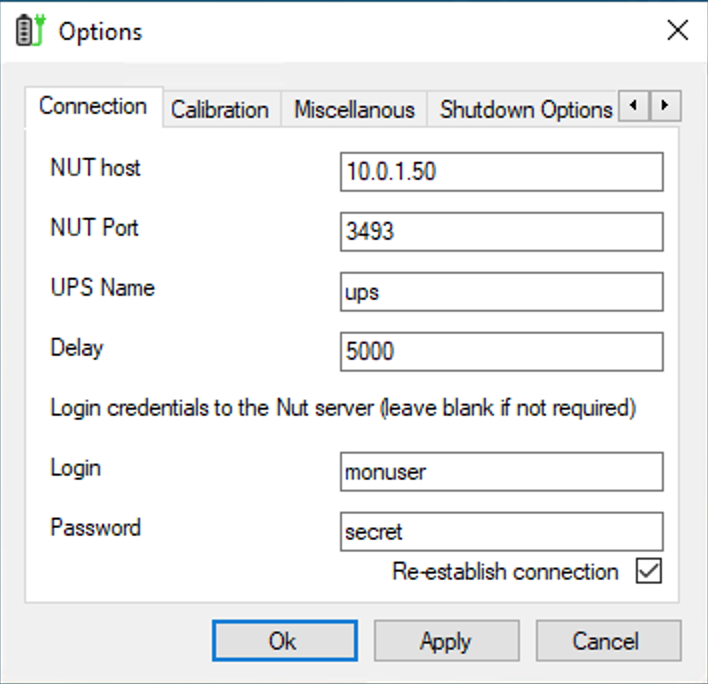
  • “Nut host” is the IP address of your Synology
  • “NUT Port” is the default of 3493
  • UPS Name is: ups
  • Login is: monuser
  • Password is: secret
  • These variables can be adjusted by editing this file “/usr/syno/etc/ups/upsd.users” on the synology
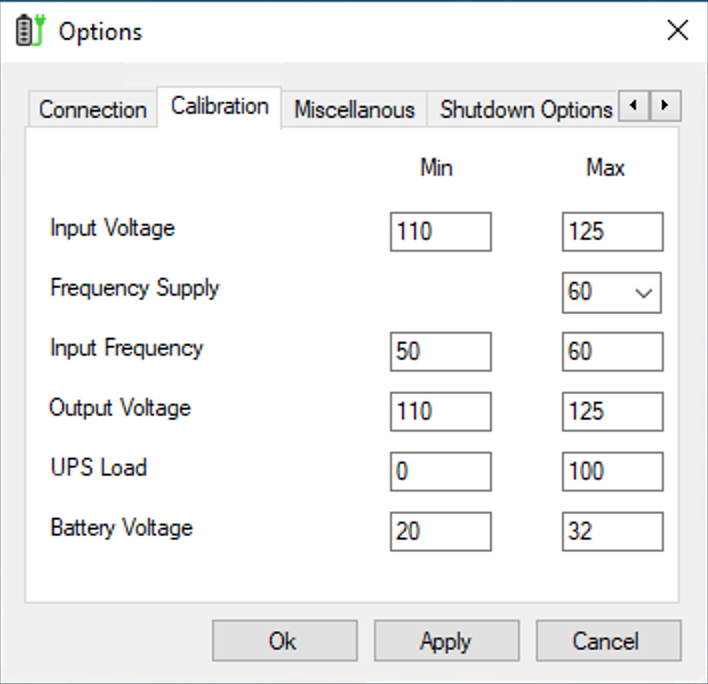
  • You can then click on the “Calibration” tab and adjust settings accordingly. In the USA, these are the settings that work for me.
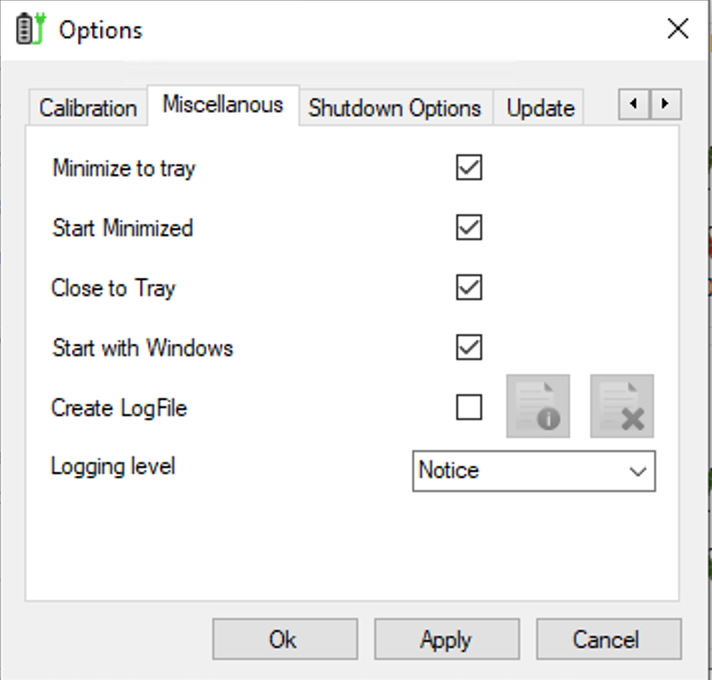
  • On the “Miscellanous” (yes, the app dev misspelled it) tab I chose to “Minimize to tray”, “Start Minimized”, “Close to Tray”, and “Start with Windows” options. This way WinNUT starts and hides itself when Windows starts up.
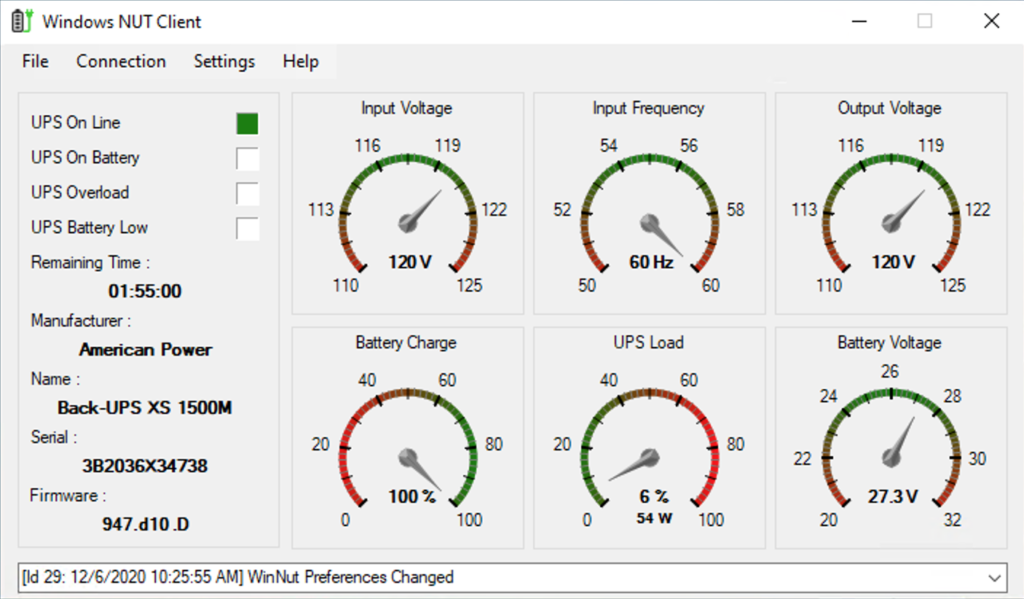
This is what it will look like in the end when everything is functioning!


Recipe to keep your PC running and clean

I’m constantly being asked, “How do I keep my Windows based PC safe”.  In truth, it’s nearly impossible, but here is my recipe:


  • Antivirus and Malware prevention

    • The best way to protect yourself from viruses and malware is to prevent them from happening in the first place.  Antivirus is nearly useless, as it rarely prevents infections these days (However, it is still a “best practice” to run it).
      1. Use OpenDNS.  They offer free malware filtering for your whole network.  You simply change your DNS servers in your router to them, and you are instantly protected.
      2. HostMan is a handy utility that you install on your computer, and it updates your computers host file, so it WON’T talk to known “bad” websites.
      3. The Microsoft Enhanced Mitigation Experience Toolkit is yet another tool you can run to make your programs follow best security practices and keep them from being exploited.
      4. There is a VERY nasty piece of malware going around right now that will encrypt your data and hold it for ransom.  You can help prevent it by installing the CryptoPrevent tool.
      5. Keep all of your software up to date.  Most people think they already do this when windows update runs, but there are probably many more programs on your computer that are NOT updated via windows update.  Secunia PSI and File Hippo Update Checker are tools that will take inventory of your software.  They will either let you know or, in some cases, update the software automatically.
      6. Uninstall any unused software as it can be a vector to infect your computer or slow it down unnecessarily.
      7. DO NOT use Internet Explorer (The little blue “E”) to surf the web.  Instead use a more secure browser such as Google Chrome or Firefox.
  • If you do get infected…

    • I bet 99% of Windows users right now are infected with some form of malware or a virus!  There are free tools out there to help you remove or cleanup the infection.
      1. Rkill is a great small utility to stop any running malware.  This does NOT clean malware, but simply stops it from running before you attempt to clean it up with another tool.
      2. MalwareBytes is one of the best detector and removal tools out there.
      3. ComboFix is also a good command line based solution when MalwareBytes doesn’t work.
  • Backup!!!

    • I can’t stress this one enough.  It’s the one tip that EVERYONE knows about, but few actually do.  Data loss can happen at anytime for various reasons (hardware failure, fire, theft, malware, etc).  If your data, time, and money are important (chances are they are, even if you initially think they aren’t), you NEED to back up!!!
    • There are two major types of backups, file based backups and image based backups.
      • File based backups – only backup your data (word and excel documents, pictures, videos, music, quickbooks, etc), NOT your operating system or programs.
        • For file based backups I use CrashPlan.  It is a great solution for file based backups.  Not only does it backup to a local hard drive or computer, but also allows you to backup offsite.  This is very important as it protects you from fire or theft.  The offsite backup also protects your data from malware such as CryptoLocker, which would otherwise encrypt all of your local data and hold it for ransom.
      • Image based backups – These backup EVERYTHING!  Your data, programs, operating system, etc.  They allow you to get back up and running quickly in case of a failure.
        • For image based backups I use tools such as Macrium Reflect or Acronis True image.  They allow you to get back up and running after failure very easily.
    • Backup tips:
      • Backups should be automatic!  You NEVER want human interaction (ie. swapping USB hard drives, walking USB hard drives offsite, etc).
      • MULTIPLE backups are important in case one doesn’t work properly.
      • Notifications of your backups are good, so you can tell when a backup has stopped working.
      • Apple’s photostream is NOT a valid backup or storage solution!
  • Pay close attention when installing or updating software

    • Often times when you install software, it will also try to install additional software that you did NOT ask for.  They do this because they get paid per installation, but it often times lead to start pages or search providers being changed, and computer slow down due to extra software being run.  You can often times prevent this by simply UN-CHECKING the additional software to be installed when you are installing or upgrading software.

Links to all software mentioned can be found in our useful links section.

This all sounds pretty simple right? </SARCASM>  Keeping your PC running smoothly is nearly a full time job all in itself.  If you are not up to the task, or would rather spend your time doing something else, we are here to help!  Please feel free to contact us (call or email) so we can setup a time to get  your PC running safely and smoothly.

Apple’s proprietary hard drives in iMacs

In case you were NOT aware (most people are NOT), Apple began using
proprietary hard drives in their late 2009 iMacs and newer.  You can
read about it here:

http://blog.macsales.com/2751-proprietary-cable-can-put-the-brakes-on-upgrading-late-09-imacs

OWC has links to drives for sale that MAY be able to help you.  I say
MAY because, not only do these drives NOT contain the proprietary
firmware that is on the Apple manufactured hard drives, but they also
do NOT have the proprietary thermal sensing port on the drive.  On top
of that, you MUST run this piece of $30 software:
http://www.hddfancontrol.com/  in order to prevent the internal fans
from spinning at full speed.  However I was warned by OWC technical
support, that even doing all of this, it STILL may NOT work.

OWC offers their “Turnkey Upgrade Program” for select newer iMacs:
http://eshop.macsales.com/shop/turnkey/iMac  For this upgrade, you
MUST ship them your iMac.  They have a proprietary piece of hardware
they can install to replace your factory hard drive.

Another option if you live in San Diego, is to take the computer to
Apple specialist, Crywolf:

Crywolf
7634 Clairemont Mesa Boulevard, San Diego, CA
(858) 277-9653
crywolf.com

They claim to have a proprietary cable which will allow your iMac to
use any standard off the shelf SATA hard drive.  However, they will
NOT sell you this cable directly.  You must have them replace your
failing hard drive.  Here is a list of their current prices as of
10/10/12:

$99 for labor
Drive prices as follows:
500GB $100
1TB $120
2TB $160
3TB $230

I have searched high and low for this elusive proprietary cable, and
only found one manufacturer in germany:
http://www.gravis.de/services/technik-service/aufruestungen/gravis-cbreeze/


HOWEVER, they will NOT sell it to individuals.  The last reason I
heard, is because they already have an “authorized reseller” in the
USA with exclusive rights to their adapter.

Update 1/30/13:  

I have found another possible custom cable to help:

http://www.thebookyard.com/product.php?products_id=10085

but it is $78!

How to activate iPhone tethering and MMS

These instructions are for those of you who wish to tether your iPhone to your Mac.  This only works on iPhone OS 3.0 and 3.01 (NOT 3.1, yet).  Jailbreak or extra fees to AT&T are NOT necessary to make this work!

How to enable tethering:

  • Run Safari mobile web browser on the iPhone.
  • Visit the following Mobileconfigs website:  http://help.benm.at/tethering.php
  • Select your country.
  • Select your mobile service provider.
  • Tap Install to install new profile.
  • Select Install Now to download and install new profile.
  • On iPhone interface, go to Settings -> General -> Network -> Internet Tethering.
  • Set Internet Tethering to On.
  • If prompted that Bluetooth is off, select Turn on Bluetooth or USB Only according to your preference.
  • Internet tethering is now enabled, connect your iPhone to your Mac via USB or Bluetooth to start connecting to Internet through the iPhone as tethered Internet gateway modem.  While using this feature the top of your iPhone screen will glow blue to notify you tethering is active.

How to enable MMS:

  • Visit the following Mobileconfigs website:  http://help.benm.at/mms.php
    • Its best to visit on your computers browser, so you can reference the settings while entering them into your iPhone.
  • Select your country.
  • On your iPhone go to Settings -> General -> Network -> Cellular Data Network
  • Scroll down to the MMS section.
  • Enter the data from the Mobileconfigs website in the appropriate fields.
  • Restart your phone.

To verify MMS is active, go to the Messages application, create a new message.  Next to text entry box, you should have a little camera button, where you can select a picture to attach to your message.  If not, something went wrong with your setup.

My visual voicemail stopped working after I enabled tethering.  Here are the instructions to fix visual voicemail:

  • Go to Settings -> General -> Reset -> Reset Network Settings.
    • NOTE:  Do NOT use the Settings -> General -> Network -> Cellular Data Network -> Reset Settings.  If you do this your tethering will stop working and have to be setup all over again.
  • After the short reset, iPhone should be able to be used for MMS, Voicemail and Internet tethering.

Sync your Facebook Fan Page to Twitter

If you are a Facebook Fan Page administrator, here is a very easy way to sync your updates to Twitter.  Facebook-to-Twitter

  • Sign into your Facebook account
  • Go to http://www.facebook.com/twitter
  • Click on “Link a Page to Twitter”
  • Select the Facebook Fan Page you want to link to your Twitter account
  • You will be redirected to Twitter to authorize Facebook access (you may need to sign into Twitter)
  • Next you will configure the settings for what information gets sync’ed to Twitter
  • Your done!

Source:  http://www.theinternetjourney.com/social-networks/twitter-social-networks/facebook-twitter-fan-page/

iPhone MMS coming soon, whats the big deal?

With all the hype about MMS finally coming to the iPhone, I finally have to rant…

I’m sure most of you are familiar with SMS, a technology that allows you to send 160 characters at a time, that was first introduced in 1992.  MMS was the next evolutionary step, that allowed people to send not only text, but also pictures and/or audio, and is generally limited to 100-300 KB’s.  Email, on the other hand, allows you to send messages FAR GREATER in size and content.  Typically limited to 20-30 MB’s!

So why is it that people are so into TXT’ing and sending MMS’s?  Can you all see you are playing into the pocket books of the carriers?  They charge on both ends of the messages, sending and receiving.  SMS is typically 20 cents and MMS is typically 50 cents.  That means carriers get 40 cents per SMS and $1 for each MMS!  Outrageous!  Yet everyone can’t wait to be able to send them.

Whats even worse, are “smart phone” users who have unlimited data and email access, who STILL send SMS and MMS message!

I don’t think most people realize they CAN do email on their phone without a data plan.  Just about every carrier has what is known as a SMS or MMS to email gateway.  This means you can send a SMS to an email address, or receive email to your SMS capable device.  Here is a list of addresses to do this on the major carriers in the USA (number = your 10 digit mobile number):

AT&T:
SMS:  [email protected]
MMS:  [email protected]

Verizon:
SMS:  [email protected]
MMS:  [email protected]

T-Mobile:
SMS:  [email protected]

Sprint PCS:
SMS:  [email protected]
MMS:  [email protected]

Sprint Nextel:
SMS:  [email protected]
MMS:  [email protected]

A comprehensive list can be found here.